Dec 26, 2011
Dec 22, 2011

Dec 19, 2011
Kid At A Candy Shop
This week, the Merc is at the rustproofers.
I went in today to see what lurked underneath the dirt, grime, oil, and carpets once they were gone and the guy had cleaned up the surfaces somewhat.
Let's start with the worst rust damage present in the car and go from there.

The rust here is something that needs to be fixed right. It's going to be expensive and time-consuming, so for now it will have to wait. In the mean time, we're going to just clean up the rust a bit and apply rust transformer.
Onwards with the "rust status" story:
The rear wings are one of this particular car's two problem areas. There is evidence of fledgling rust, and also, a rust repair that is not of satisfactory quality (read: it's a botch job). This, along with the trunk, will have to get fixed in the years to come.
Now that the grime is gone, I can, for the first time, confirm service history markings noting that some parts of the suspension have been replaced recently:


One noteworthy thing is that it's clear this car has been rustproofed at some point. It's not as good quality as a Finnish pro does it this day and age, but there were some good points. One of them was an occasional visible rustproofing of some body cavities, visible here as the yellow substance:

That's it for details. Overall the car is pretty clean "under the foreskin". As you can see, took me 14 months to confirm it, but it's great to finally know it's not a time bomb, body-wise.
Some miscellaneous pics:


I'm feeling pretty good about what I saw, and also, it was great to see the car without all the dirt and grime. I was like a kid in a candy shop, looking at it from near and far and from different angles for the best part of an hour. :-)
I always say the age of a car is no excuse for rust. Very often, when selling cars, people tend to say things like "this car is X years old... you can buy new ones at the dealership". That's a crock. If a car's been maintained right, it has no rust, period. IMO taking rust for granted is for people who can't afford to stop rust as soon as they spot it.
In any case, mine unfortunately has some, but that is just something that has to be fixed, when I get around to it.
I went in today to see what lurked underneath the dirt, grime, oil, and carpets once they were gone and the guy had cleaned up the surfaces somewhat.
Let's start with the worst rust damage present in the car and go from there.
 |
| This is the passenger side interior wall of the luggage compartment. The rust there is already pretty bad. To explain it in a little bit more detail I need to show a couple more pics: |
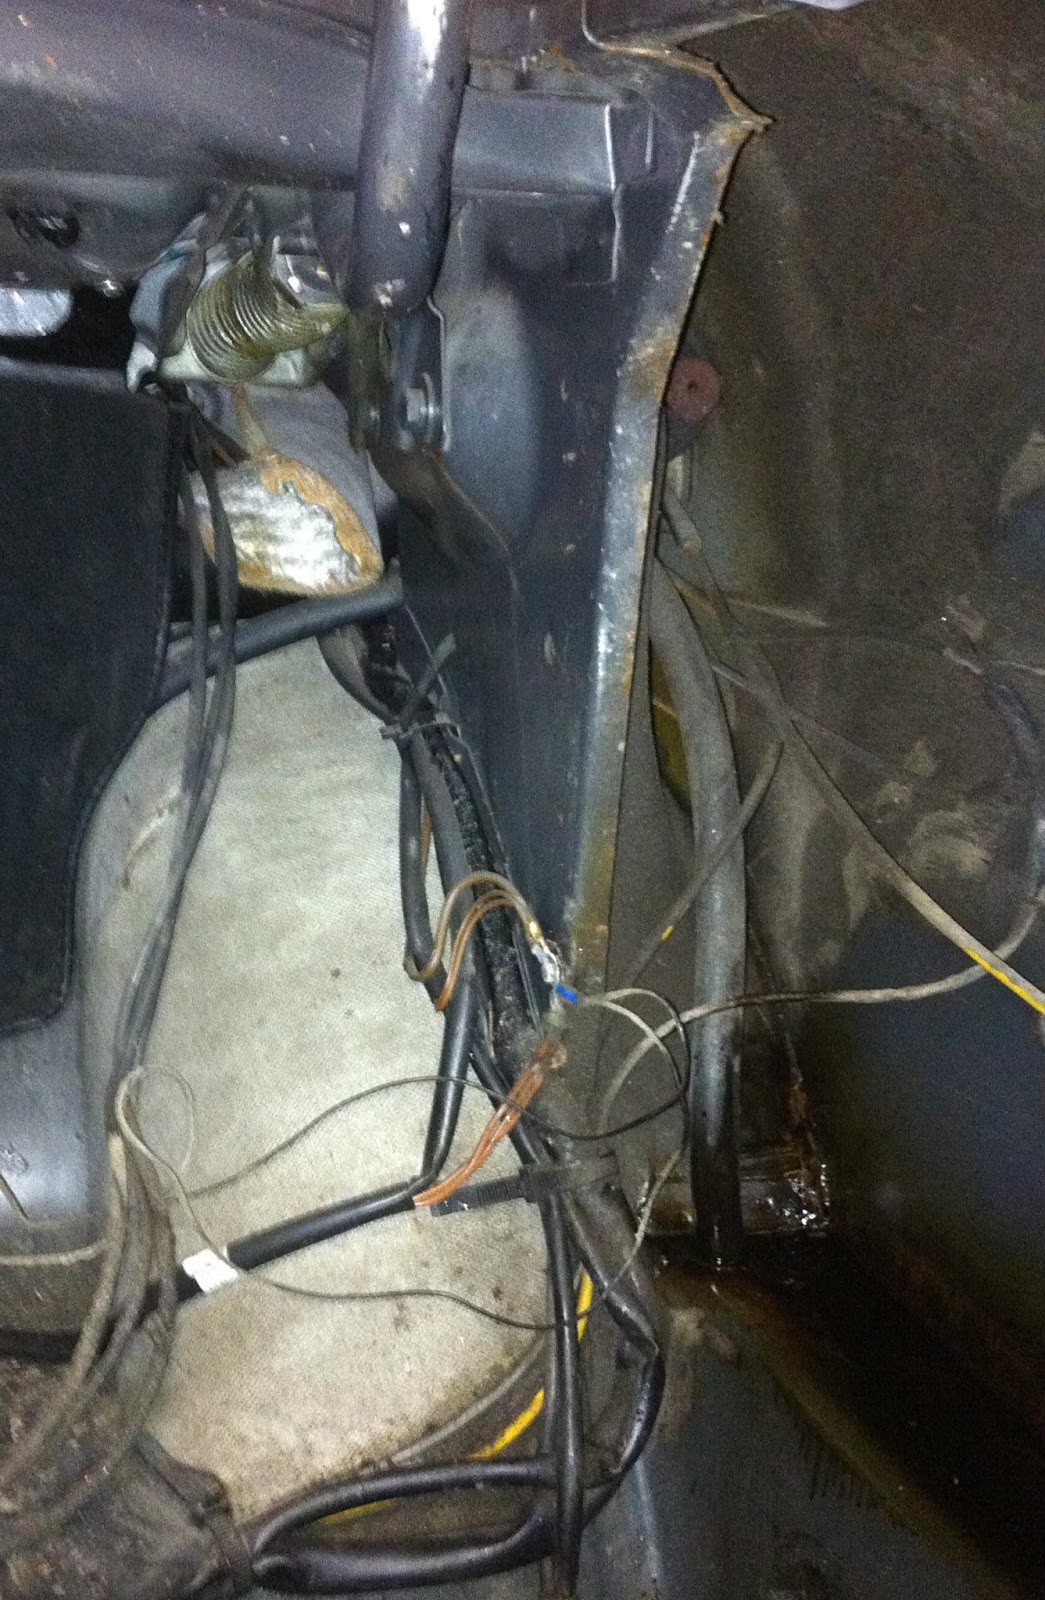 |
| The hose visible on the right is a rainwater drain hose. It runs from somewhere around the rear glass to the spot visible in the pic. The horizontal surface of course is the one also visible in the pic before. The hose hadn't been attached to the exit hole. This resulted in rainwater getting trapped in the trunk, causing the metal to rust. |
The rust here is something that needs to be fixed right. It's going to be expensive and time-consuming, so for now it will have to wait. In the mean time, we're going to just clean up the rust a bit and apply rust transformer.
Onwards with the "rust status" story:
 |
| This is the opposite side vent area. There's some rust here, too, but not nearly as bad. |
 |
| Spare wheel well looks pretty neat. |
 |
| Looking up at the trunk "roof". What you're looking at is the infamous W126 window frame metal sheet. Water gets trapped there and the result is something like this. There is a fix, and the sheetmetal there gets replaced, and it seems obvious that my car has received this threatment at some point in its life. |
 |
| As for infamous rust spots, here are the jack holes. They appear surprisingly healthy, so not much to say here. |
 |
| Ditto for wheel wells. There appears to be very little meaningful surface rust. The front wings appear to have been swapped at least once. Well it's obvious, looking at the odo and how rust-free the panels are. |
 |
| The inside of one of the front wings; the wing is rostfrei, the wheel well is just odd-colored, not rusted. |
The rear wings are one of this particular car's two problem areas. There is evidence of fledgling rust, and also, a rust repair that is not of satisfactory quality (read: it's a botch job). This, along with the trunk, will have to get fixed in the years to come.
Now that the grime is gone, I can, for the first time, confirm service history markings noting that some parts of the suspension have been replaced recently:
One noteworthy thing is that it's clear this car has been rustproofed at some point. It's not as good quality as a Finnish pro does it this day and age, but there were some good points. One of them was an occasional visible rustproofing of some body cavities, visible here as the yellow substance:
That's it for details. Overall the car is pretty clean "under the foreskin". As you can see, took me 14 months to confirm it, but it's great to finally know it's not a time bomb, body-wise.
Some miscellaneous pics:
I'm feeling pretty good about what I saw, and also, it was great to see the car without all the dirt and grime. I was like a kid in a candy shop, looking at it from near and far and from different angles for the best part of an hour. :-)
I always say the age of a car is no excuse for rust. Very often, when selling cars, people tend to say things like "this car is X years old... you can buy new ones at the dealership". That's a crock. If a car's been maintained right, it has no rust, period. IMO taking rust for granted is for people who can't afford to stop rust as soon as they spot it.
In any case, mine unfortunately has some, but that is just something that has to be fixed, when I get around to it.
Dec 9, 2011
Some Much-Needed Support
Today: passed inspection and emissions, with flying colors! This was the first attempt while I've owned the car.

Emissions pass is a huge relief, because there are differing opinions on whether you can MOT a car here, in the following situation:
In this case, the vehicle not being low-emissions was enough. Emissions were judged as if there never was a catalytic converter in the vehicle.
The chassis, suspension, brakes and other technicals were all in good order.
So, as they say in Finland: kovaa ajoa! (hard miles)

Emissions pass is a huge relief, because there are differing opinions on whether you can MOT a car here, in the following situation:
- Car is not tagged low-emissions; thus catalytic converter is not supposed to be obligatory
- Catalytic Converter has been removed
- Catalytic Converter should be in the car according to the vehicle data registry (in other words: the MOT guy's computer)
In this case, the vehicle not being low-emissions was enough. Emissions were judged as if there never was a catalytic converter in the vehicle.
The chassis, suspension, brakes and other technicals were all in good order.
So, as they say in Finland: kovaa ajoa! (hard miles)
Dec 6, 2011
Rubbing the Wood
The center console wood had some pretty bad scratching and swirl marks.

I decided to sand and polish it while I was switching the gearshift bulb.
First, 1500 grit sandpaper:

Then 2000 grit sandpaper:

Finally, a rubbing compound with a semi-hard cloth. Result:

Whole piece done, and waxed. I also re-glued the rubber surround around the gearlever.

The lacquer on it has cracked in several spots, but that obviously cannot be fixed. The only way is to refinish it. Doing that, you'd have to do the whole vehicle, since the result will most likely be kinda "off".
One of these days, I'm going to have to do this same process in a more involved manner.. By removing the switchwork and other trim, I can do a better job of buffing the lacquer.
I put the radio in place since I'm out of time and have to drive the car to places. It's not wired yet, though. I was able to source all connectors, so all that remains as far as wiring, is identifying all the speaker wires and soldering the main power connector to the wires.
I decided to sand and polish it while I was switching the gearshift bulb.
First, 1500 grit sandpaper:
Then 2000 grit sandpaper:
Finally, a rubbing compound with a semi-hard cloth. Result:
Whole piece done, and waxed. I also re-glued the rubber surround around the gearlever.
The lacquer on it has cracked in several spots, but that obviously cannot be fixed. The only way is to refinish it. Doing that, you'd have to do the whole vehicle, since the result will most likely be kinda "off".
One of these days, I'm going to have to do this same process in a more involved manner.. By removing the switchwork and other trim, I can do a better job of buffing the lacquer.
I put the radio in place since I'm out of time and have to drive the car to places. It's not wired yet, though. I was able to source all connectors, so all that remains as far as wiring, is identifying all the speaker wires and soldering the main power connector to the wires.
Dec 4, 2011
Gear Selector Lighting
If the gearshift lights on your W126 are out, the problem is most likely a blown bulb, as usual with center console illumination. There is one bulb down under the front of the gear selector "box", which is located under the large wood panel. This bulb illuminates the gear symbols, and the fiber that accompanies the shifter, adding a brighter light to the currently selected gear.
First you have to take out the ash tray. It's held in place with two philips screws located under the chrome cup. Unscrew and pull.
After this, the front section of the middle wood paneling lifts off. You have to lift the front end of the panel, after which the whole bit lifts off. This may be either a wood panel like mine, or a storage tray, depending on model/year/options.

Once that piece is off, the large wood panel slides forward and lifts off.

Do not just lift, the plastic clips that hold the panel in place will break.
Completely removing the panel is not necessary to just replace the gearshift bulb.
The bulb is the white piece visible directly below the forward edge of the wood panel:

Pull bulb housing downwards, replace bulb, repeat above steps backwards. Enjoy your great new illumination!
While I was in there, I looked at how the gearlever shaft is connected to the box. My plan was to change gearlevers immediately. Unfortunately, it doesn't look like this will get done this time round.
The shaft is screwed on with a locking nut at the far end. The far end is obscured by a rubber sock, hidden inside the shifter box. To get to the nut, I'd have to unscrew two easily accessible screws at the top, and four bolts at the bottom.
The four bolts are proving a problem and basically preventing the whole thing. They are located under air ducts heading to the rear passenger compartment. To remove the air ducts, the side panels of the center console have to come out. To remove the side panels is basically an equal task to just lifting the whole center console out the car.
In addition, it is recommended that the gearlever be separated from the gearshift linkage before it is taken out. This has to be done from the underside of the car.
The knob cannot be simply swapped from the shaft I bought to the one in the car. OEM leather knobs are sewn onto a T-shaped shaft. Separating the knob from the shaft would require cutting the seams and peeling the leather and filler off the shaft in pieces. The aftermarket knob has been installed by a PO by dremeling an OEM knob off the shaft, and attaching the knob to the shaft-stub with a silicone-like paste.
In a nutshell: installing the OEM gearshifter is a real bitch of a job and won't get done now.
In other news, in preparation for installing the original Becker sound system, I ripped out the aftermarket front speakers that stood out like a sore thumb. Spot the difference:


First you have to take out the ash tray. It's held in place with two philips screws located under the chrome cup. Unscrew and pull.
After this, the front section of the middle wood paneling lifts off. You have to lift the front end of the panel, after which the whole bit lifts off. This may be either a wood panel like mine, or a storage tray, depending on model/year/options.
Once that piece is off, the large wood panel slides forward and lifts off.
Do not just lift, the plastic clips that hold the panel in place will break.
Completely removing the panel is not necessary to just replace the gearshift bulb.
The bulb is the white piece visible directly below the forward edge of the wood panel:
Pull bulb housing downwards, replace bulb, repeat above steps backwards. Enjoy your great new illumination!
While I was in there, I looked at how the gearlever shaft is connected to the box. My plan was to change gearlevers immediately. Unfortunately, it doesn't look like this will get done this time round.
The shaft is screwed on with a locking nut at the far end. The far end is obscured by a rubber sock, hidden inside the shifter box. To get to the nut, I'd have to unscrew two easily accessible screws at the top, and four bolts at the bottom.
The four bolts are proving a problem and basically preventing the whole thing. They are located under air ducts heading to the rear passenger compartment. To remove the air ducts, the side panels of the center console have to come out. To remove the side panels is basically an equal task to just lifting the whole center console out the car.
In addition, it is recommended that the gearlever be separated from the gearshift linkage before it is taken out. This has to be done from the underside of the car.
The knob cannot be simply swapped from the shaft I bought to the one in the car. OEM leather knobs are sewn onto a T-shaped shaft. Separating the knob from the shaft would require cutting the seams and peeling the leather and filler off the shaft in pieces. The aftermarket knob has been installed by a PO by dremeling an OEM knob off the shaft, and attaching the knob to the shaft-stub with a silicone-like paste.
In a nutshell: installing the OEM gearshifter is a real bitch of a job and won't get done now.
In other news, in preparation for installing the original Becker sound system, I ripped out the aftermarket front speakers that stood out like a sore thumb. Spot the difference:
Subscribe to:
Posts (Atom)