Dec 1st - trip down to Helsinki, driver side temp adjuster bulb went dark, but fixed itself the next time I drove the car and has worked since.
Dec 4th - passed inspection with no warnings. Inspection 40 EUR + emissions 10 EUR. Nothing has been done to the brakes or suspension for the last 23 000 km / 3 inspections. BTW, inspector thought I was inspecting a garage queen / summer car. :-)
Dec 5th - refueled in Svetogorsk @ 0.932 e/l & 12,9 l/100km, forgot to take my 10L canister though.
Currently: 1000km overdue for an oil change, but I did manage to buy the oil. I elected for Valvoline Maxlife 5W-40 Synthetic Blend. I'm running 10W-40 currently but noticed lifter clack at low temps last spring. Going back to 5W should fix that.
Other observations:
- Car feels like it has been getting less confused from preheating lately. I can usually drive it normally after preheating. Maybe this is happenstance but I could also see some temperature sensor wire making a better signal the more I drive the car.
- Central locking has not crapped out once, even in the cold, ever since we realized the trunk lock release was not retracting properly. I've since always helped it retract with the key, until it's all the way out. Like I said no malities with the central locking. I will keep testing and if the trend continues I will have to take the trunk lock apart, come summer.
Dec 15, 2012
Oct 27, 2012
Winter Is Here
Refueling trip to Vyborg, Russia today.
The cold is getting to these old cars - the fuel light on my buddy's W124 malfunctioned and he ran out of fuel 20km before the border.
We went to get emergency fuel with my car and when at the fuel station, I noticed my central locking had failed so it took some doing to get to the trunk.
As you may recall, I've had the central locking problem before, about a year now, except it worked perfectly over the summer. It's always been related to the trunk which is why I thought it had to be a leaky vacuum lead or other mechanical problem with the trunk lock actuator. However, today tipped at it probably being the trunk release button. When it's even slightly frozen it gets stuck somewhere in the "release" end of its movement and starts messing with the central locking - and doesn't release the trunklid.
Well, it did work eventually, so all's good.
Came back home with ~95 litres of fuel at 0.853 eur/litre. On last tank, averaged 14.6 l/100km.
Speaking of the cold, these are from yesterday:


That was only a frozen surface, no snow. We got actual snow today, therefore the first powerslide of winter 2012-2013 happened on 27.10.2012!
The cold is getting to these old cars - the fuel light on my buddy's W124 malfunctioned and he ran out of fuel 20km before the border.
We went to get emergency fuel with my car and when at the fuel station, I noticed my central locking had failed so it took some doing to get to the trunk.
As you may recall, I've had the central locking problem before, about a year now, except it worked perfectly over the summer. It's always been related to the trunk which is why I thought it had to be a leaky vacuum lead or other mechanical problem with the trunk lock actuator. However, today tipped at it probably being the trunk release button. When it's even slightly frozen it gets stuck somewhere in the "release" end of its movement and starts messing with the central locking - and doesn't release the trunklid.
Well, it did work eventually, so all's good.
Came back home with ~95 litres of fuel at 0.853 eur/litre. On last tank, averaged 14.6 l/100km.
Speaking of the cold, these are from yesterday:
That was only a frozen surface, no snow. We got actual snow today, therefore the first powerslide of winter 2012-2013 happened on 27.10.2012!
Oct 14, 2012
Photoshoot in Imatra
Enjoy the pics! Location: Imatra


By the way: I was able to negotiate a car wash deal: unlimited car washes until the end of April for 15 EUR / month! I plan to take the car to brushless washes (with wax) weekly or bi-weekly over the winter, or every time I'm back from driving on salt roads (such as refueling trips).
By the way: I was able to negotiate a car wash deal: unlimited car washes until the end of April for 15 EUR / month! I plan to take the car to brushless washes (with wax) weekly or bi-weekly over the winter, or every time I'm back from driving on salt roads (such as refueling trips).
Oct 10, 2012
107-numbered Emblems Are Rubbish
I'm truly disappointed with the production quality of the little emblem I bought in February. It's already shedding paint and it's about 9 months /
8500 km old.

M-B gave me a new one through the two-year OEM Part Warranty. But I can't help but suspect this might happen again.
M-B gave me a new one through the two-year OEM Part Warranty. But I can't help but suspect this might happen again.
Oct 6, 2012
Getting Ready for Winter
Yesterday, the SEC was at the cleaning shop for a repeat cleaning of the rooflining and center console stain. It was free because I mentioned in passing to the shop's owner that the mentioned places had been left dirty last time the car was there. This time they did a better job, the rooflining is nearly perfect and the stain is better, not gone but much better. While the car was there, I think they also did some extra cleaning inside, so all's good.
I also had the chance to borrow a friend's garage in order to prep the car for the winter season. Starting with the wax, I did the usual: wash, clay, quick wash again, wipe dry, wax.


Applied 2 coats of longlife wax to the hood and side sheetmetal, and 1 coat to other panels. I also waxed the windows, except windshield. This improves the look of the glasswork and should improve visibility in the rain.
Also polished and waxed the front bumper's brightwork, neglected to take a pic.


Also, I got this from ebay. It's the so-called lightning sticker, warning drivers from touching the high-voltage ignition leads. All Mercedes from the period should have one like this. Note, this has a W123 part number. It is no longer available at the dealers, they only sell the "new design" as seen on W124s.
I spent some time cleaning the engine bay again, had the airbox off and wiped down the valve covers etc. While I had the airbox off I decided to oil the throttle linkage again. I also oiled the hood hinges and door/trunk lock mechanisms.

Car should be ready for the winter season. Doing all this only took me about 12 hours, so not too bad.
I also had the chance to borrow a friend's garage in order to prep the car for the winter season. Starting with the wax, I did the usual: wash, clay, quick wash again, wipe dry, wax.
Applied 2 coats of longlife wax to the hood and side sheetmetal, and 1 coat to other panels. I also waxed the windows, except windshield. This improves the look of the glasswork and should improve visibility in the rain.
Also polished and waxed the front bumper's brightwork, neglected to take a pic.
Also, I got this from ebay. It's the so-called lightning sticker, warning drivers from touching the high-voltage ignition leads. All Mercedes from the period should have one like this. Note, this has a W123 part number. It is no longer available at the dealers, they only sell the "new design" as seen on W124s.
I spent some time cleaning the engine bay again, had the airbox off and wiped down the valve covers etc. While I had the airbox off I decided to oil the throttle linkage again. I also oiled the hood hinges and door/trunk lock mechanisms.
Car should be ready for the winter season. Doing all this only took me about 12 hours, so not too bad.
Sep 19, 2012
AMG Penta Restoration, Part II: The Result
Two weeks ago, I took the Pentas out for paint. They were spraypainted 735 Astralsilver, with a shiny clearcoat. Reasoning for the color is:


I got some used full metal valves for them from a friend. Before mounting them, I had to do a bit of a restoration job on the valves. I had a couple weeks to do that, since the clearcoat on the wheels will need to harden for 1-2 weeks before taking the wheels to a tyre shop.
I was pretty ecstatic with how the Pentas turned out:


Tires are GoodYear UltraGrip Ice+ 205/55 16" which I had bought previously for the BBS RS wheels.
There was a problem while mounting the tires. It turns out while restoring wheels you should always leave the hub unpainted. This is so obvious now, but I just didn't think of it. Neither did the sodablast guy, or the painter. So of course on two wheels' hubs there were uneven clearcoats with some bubbles as a bonus. This threw the balancing off and I had to scrape the bubbles off with a razor. Even so, two of the wheels were a bit more involved to balance. Oh well, you live and learn.
The wheels are straight, so they could be made perfect by grinding the clearcoat and paint off the hubs, but I think I'm going to live with the extra wheel weights, at least until the next set of tires. Driving home, the wheels had zero vibration.
Speaking of wheel weights, you might recall previously the wheels had knock-on weights on the outside rim. Since the wheels now look nice and shiny, I had the tire guy put glue weights on the inside. They are less visible to the outside, but more involved to get just right, and the glue can let go. I figured since I drive little over the winter, and slowly at that, I should be ok with glued weights.
The tires feel so good. It's hard to describe in a reasonable amount of text what a transformation the change from summers to frictions makes. Initially, I can put my finger on:
- The best way to accomplish 199 with polished lips is first polishing the lips, then having the rims oven-baked with hard lacquer and then only painting the centers with color.
- I had already set a date for paint and did not want to cancel that.
- There are no oven painters nearby.
- I don't know anyone offhand who would polish the lips and doing it myself would require constructing a rig from scratch, which would most likely not happen before winter.
- There is a problem with painting rims only partly; most paint shops I've asked don't want to do it, and doing it myself would probably not be robust enough for winter use.
- 735 Astralsilver is the default color for Mercedes-Benz silver color wheels.
I got some used full metal valves for them from a friend. Before mounting them, I had to do a bit of a restoration job on the valves. I had a couple weeks to do that, since the clearcoat on the wheels will need to harden for 1-2 weeks before taking the wheels to a tyre shop.
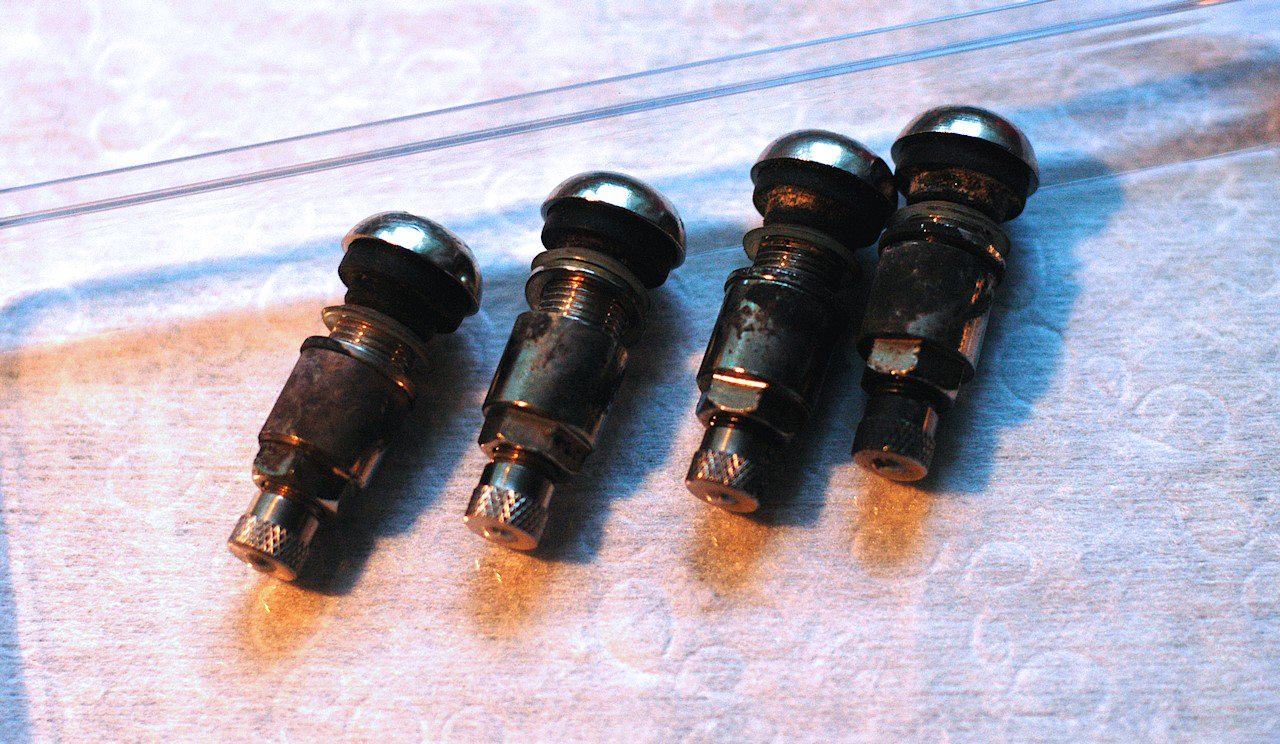 |
| Here's how the valves looked when I got them. On them was a rock-hard coat of what I suppose was brake dust. It felt like paint. It was all over the valves and even on the caps. I tried white spirit, WD40 and Brake Cleaner and it would just not wipe off. |
 |
| The valve has a rubber O-ring on the inside. I gave it a silicone bath in order to freshen it up. This should minimize the risk of air leaks, after all the valves are used. |
 |
| I lucked out and got a set of MINT metal valve caps for free at a local Euromaster tire shop. They look brand new and more importantly, they are basically the same shape as the old brake dust covered ones were. If I were to go buy these at an accessory retailer, they would be "tuning parts" which means colors like copper, electric blue and pink, low material quality, excessive length and thickness, and high price. These ones, OTOH, look small and classy. |
 |
| I tried scraping the black crud
off with my bare nails and that worked. So giving the parts a toxic bath
and then scrubbing did the trick. I cleaned up the fat part, and left the actual valve part with grooves be, since that will be hidden by the other bit. |
I was pretty ecstatic with how the Pentas turned out:
Tires are GoodYear UltraGrip Ice+ 205/55 16" which I had bought previously for the BBS RS wheels.
There was a problem while mounting the tires. It turns out while restoring wheels you should always leave the hub unpainted. This is so obvious now, but I just didn't think of it. Neither did the sodablast guy, or the painter. So of course on two wheels' hubs there were uneven clearcoats with some bubbles as a bonus. This threw the balancing off and I had to scrape the bubbles off with a razor. Even so, two of the wheels were a bit more involved to balance. Oh well, you live and learn.
The wheels are straight, so they could be made perfect by grinding the clearcoat and paint off the hubs, but I think I'm going to live with the extra wheel weights, at least until the next set of tires. Driving home, the wheels had zero vibration.
Speaking of wheel weights, you might recall previously the wheels had knock-on weights on the outside rim. Since the wheels now look nice and shiny, I had the tire guy put glue weights on the inside. They are less visible to the outside, but more involved to get just right, and the glue can let go. I figured since I drive little over the winter, and slowly at that, I should be ok with glued weights.
The tires feel so good. It's hard to describe in a reasonable amount of text what a transformation the change from summers to frictions makes. Initially, I can put my finger on:
- The steering suddenly got very light and comfortable. It even feels more responsive. On a fast road (80 kph) even the tiniest correction on the wheel translated into a change of direction. It felt like changing tires took about 50 % or 75 % of slack off my steering gear. And boy, I can't emphasize too much how light the steering is now. You can literally steer the car with one finger whereas with the summers the steering feels somewhat heavy, definitely heavier than W124's I've driven.
- The frictions are much, much quieter. This is obvious but then there are some aspects to it that aren't immediately so. The frictions are quieter because the compound is softer. Thus the whole feel of the car, inside, is transformed. I notice way fewer rattles and sudden noises in the interior while driving on the frictions. Even driving over speed bumps or a rough asphalt spot, the car makes a soft thud, not... an edgy thud... it's really hard to describe but I definitely noticed this.
Sep 15, 2012
Ashtray Wood Repair
There was only one part of the car that fell victim to the Ahvenisto road trip. That was the ash tray. More specifically, the burlwood on it dropped off.
Unlike most pieces of trim on the car, this piece of wood is held in place with glue (or double sided tape actually). After 24 years, it let go.

Voila!
Unlike most pieces of trim on the car, this piece of wood is held in place with glue (or double sided tape actually). After 24 years, it let go.
 |
| The polished trim on the ashtray forms a lip, under which the lip on the burl locks in. |
 |
| First, I needed to get rid of the old tape. It had turned into a vaguely sticky goop which was mostly easy to just scoop off. After that, a good scrub with paper and white spirit. |
 |
| All wood parts on these were marked at the factory... When I polished the center console wood, it had a "1988" marking on it. |
 |
| Applied new double sided tape and carefully slid the lid into its "groove". |
Voila!
Subscribe to:
Posts (Atom)